In a previous post we talked about how to revive a dead GPU card using the tweezer method. In this post you will se further info to complement that revival using eeprom programmable cards, credits will go to Michal.T and we will quote is own words, so let's get started:
Situations may vary when people are left with a not functional mxm graphics module/card. The most common situation should be considered like the consequence of notebook vendors commercial/marketing policies (those policies which are limiting their products by allowing only certain graphics modules/adapters to work); people then are trying to overcome such a situation by trying to flash many and untested bios images for their graphics modules hoping such a move will solve the software incompatibility issue.
I tried such a move and got an unusable mxm graphics card. My intention was to overcome the annoying "MXM bios structure error message" at boot time which was forcing the system to post such message for 30 seconds.
People at mvktech.net site have understood how to fix the performance table of such adapters that are going no longer than the throttle frequencies and voltages, but this is another story and it covers how to let adapters like the nvidia 9600m gt one to work correclty at full speed. If the software flashing procedure went wrong in most cases we have as result a "broken" piece of hardware, we know however that we only bricked the bios (the hardware is not responding).
At first we have to try the tweezering method which consist in shortcutting pins 1 and 4 of our adapter's bios eeprom just when powering on the system.If such a method is going to work we should have a black screen with a full prompt command responding system; this means we would be able to flash the card again. The tweezering method however is not guaranteed to work every time and with all the adapters and hardware around. A hard flash in some cases is the only solution to let revive the hardware.
Such a step is not simple and people with no soldering/desoldering experience should ask others to perform such a task.
We have at first to desolder the mxm graphics module eeprom: it is usually represented with a Macronix MX25L512 chip on the top-left adapters's corner. See Fig.1 and Fig.2
Fig. 1
Fig.2
Then we need a good eeprom programmer, there are many. I have built myself a Willem rel. 6.1 one some time ago. It was when I broken my old notebook bios by putting my hands were I should not :)
Once we have a programmer we need to understand if it is capable to hard flash the Macronix chip; I had to order from a chinese shop an adapter that was suitable for.
The adapter I took is a Xeltek SA 602A. See Fig.3, Fig.4, Fig.5 and Fig.6
Fig.3
Fig.4
Fig.5
Fig.6
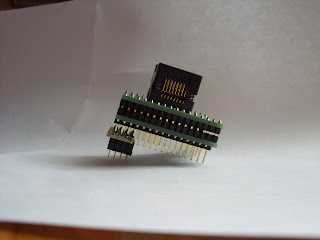
As you should see I had to built a second adapter that was allowing the Willem eeprom programmer recognize the Macronix chip. (see the top-most bottom pins configuration)
I was not sure I could use the zif socket to perform the flash procedure so then I wrapped the Xeltek adapter on a 8 pin adapter to let match its pins configuration with the socket I had to use for. See Fig.7
Fig.7
The software version that is making the willem eeprom programmer recognizing the SPI chips is the 0.98D10 version. Once I put on the adapter with the eeprom mounted in place the flash procedure was very simple. see Fig.8, Fig.9, Fig.10 and Fig.11
Fig.8
Fig.9
Fig.10
Fig.11
The last step was to resolder again the eeprom chip back in place. At last a software flash should be required due to a bad checksum calculated during the hard flash procedure. "
Many thanks once again to Michal for providing this, if you like italian you can also check his blog where he tributes a great novel writer who left this planet a few years ago.
Taken from: http://bitboard.blogspot.com/


Thank you...
ReplyDeleteThank you so much! You saved my 8600m GT! I didn't have any way to flash the bios because the pc would not post, so I took my old 8400m G and flashed it to the bios from the 8600m GT. Once the flash was done, I removed the bios chip from the 8400m G (wich was identical to the one on the 8600m GT) and soldered it back to the 8600m GT, so now the 8400 is dead, but the 8600m is running just fine! THANKS!
ReplyDelete(I know, it's not exactly what you did, but it worked perfectly)
I really enjoyed the article, this is very well-written and helpful. Although, I have been searching for long about the topic but finally I got the right article. The information you have shared with is really incredible. Keep it up
ReplyDeletePlease also send me a link for an informative blog on web design services sydney